
TABLE OF CONTENTS:
-
Operation
-
Assembling the Gel Sandwich
-
Casting the Gel
-
Removing the Comb & Spacer
-
Mounting the Gel Sandwich to the VCV Frame
-
Adding Buffer
-
Loading Sample Wells
-
Running the Gel
-
Removing the Gel
-
Maintenance of the Unit
Has your lab recently purchased an Updated IBI Scientific Single Slab Vertical VCV unit from us?
If you answered yes, then you are in the right place! Keep reading if you want to learn how to use your updated VCV system!
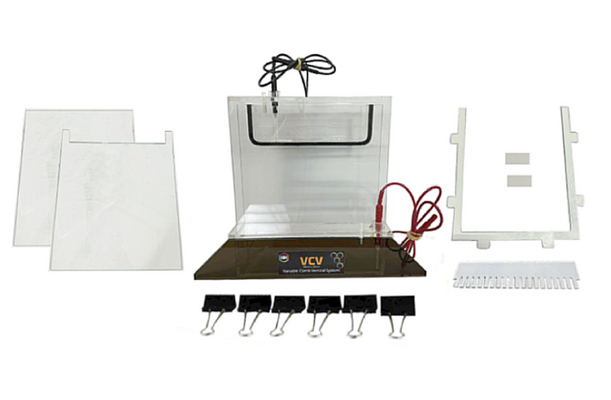
Operation
Your new VCV Vertical Electrophoresis Unit allows rapid analysis of protein and nucleic acid samples in a 22cm by 18cm format, utilizing either agarose or polyacrylamide gels. This system also allows analysis to be completed in less than 90 min, while still maintaining comparable gel resolution.
Assembling the Gel Sandwich
- Before assembly, wash each glass plate with warm soapy water and rinse well. Allow the plates to dry.
- Apply 70% alcohol to each plate and wipe dry with a lint-free cloth.
- Wipe the "one" piece silicone spacer with 70% ethanol to remove any residue.
- Place the solid glass plate on the platform of the gel casting stand. Once you have the angle of the gel stand to where you would like, tighten the adjustment knobs.
- Now place the single piece spacer onto the solid glass plate using the grab tabs.
- With the one-piece spacer in place, set the "notched" glass plate on top of the solid glass plate and spacer with the notched side up.
- Clamp all 6 metal clips around the exterior of the glass sandwich.

Casting the Gel
- With the gel sandwich clamped and resting on the stand, you can now begin to pipet the poly solution between the glass plates
- Fill the glass sandwich just below the edge of the notched glass plate. If you need to leave space for a resolving gel, you can do so now.
- Once the preferred gel level is reached, insert the comb and allow the gel polymerize.
Removing the Comb and Spacer
- Once the gel is firmly set, remove the comb carefully. If the comb doesn't want to come out, you can pipet a small amount of running buffer around the teeth to loosen the comb.
- Remove all 6 clamps from the glass sandwich.
- Using the spacer tabs protruding from the glass sandwich, gently remove the one-piece spacer from the glass sandwich.
- Once the spacer has been removed, insert 2 spacer dams into the top of the gel sandwich to prevent buffer from leaking out.

Mounting the Gel Sandwich to the VCV Frame
- Turn the gel sandwich so the notched plate is facing inward on the VCV frame.
- Make certain the gel sandwich is straight up & down and flush against the upper reservoir gasket. The upper reservoir gasket should seal right around the notched area of the inner glass plate.
- Using 2 of the metal clamps, clamp the glass gel sandwich to the VCV frame. Place the clamps near the top of the gel sandwich directly over the upper reservoir gasket to provide a good seal.
Adding Buffer
- Prepare 920 ml of running buffer. The upper and lower reservoirs will allow for 460 ml of buffer.
- Add 460 ml of running buffer to the top reservoir, filling until the buffer level reaches over the cross-sectional gel area between the glass plates, but below the top of the glass plates.
- Add the remaining buffer to the bottom reservoir making certain not to spill any.

Loading Sample Wells
- Load the samples into the gel wells using a pipet.
- Insert the pipet into the gel well about 1-2 mm from the bottom of the well & dispense.
Running the Gel
- Place the VCV lid on the unit.
- Align the orientation holes in the cover with the white pins sticking out from the frame.
- The black banana jack on the frame should align with the black power cord, and the red banana jack should align with the red power cord.
- Attach the electrical lead of your power supply (200 VDC min) to the VCV unit.
- Apply power to the VCV unit and begin the electrophoresis run.
Removing the Gel
- After the electrophoresis run is complete, turn off the power supply and disconnect the black and red power leads from the power supply.
- Remove the VCV cover.
- While wearing gloves and protective eyewear, remove the 4 clamps holding the gel sandwich to the frame.
- Remove the gel sandwich from the VCV frame by raising upward out of the lower reservoir.
- Lay the gel sandwich on a paper towel on a flat surface. Gently pry the glass plates separating them to access the completed gel.
Maintenance of Unit
- Always handle the unit with care
- Do not expose the unit to temperatures above 140 degrees Fahrenheit
- Do not expose the unit to organic solvents
- Do not clean the unit with abrasive cleaners
With the updated IBI Scientific Vertical VCV system the days of annoying electrophoresis processes are over. Do your lab a favor and upgrade your outdated VCV system with the new and improved IB62000 today!
Click HERE to purchase the upgraded IBI Scientific Single Slab Vertical VCV for your lab now!

If you have any questions regarding the IBI Scientific Single Slab Vertical VCV please email us at info@ibisci.com or call us at 800-253-4942
Written By: Katie Draves
